I’m looking for a solution to monitor the levels of my water tanks, remotely. Remotely as in from the house (150 metres away), not necessarily over the Internet.
4G solutions are out: first, I don’t have a signal (well, not easily), and second, I don’t want to pay by the month. So sorry TankMate and FarmBot, you’re out (since wifi isn’t ideal either).
Similarly Davey TankSense – Bluetooth LE range doesn’t cut it.
There are 2 NZ options which look interesting – the tank can be several hundred meters away. They seem to have quite similar designs.
This table highlights the differences:
Aquatel
SmartWater / Gallagher
Sensor
Distance (ultrasonic – requires careful mounting)
Pressure
Tank power source
Batteries
Solar
Warranty (years)
5
1 (Smart Water) 4 (Gallagher Series 2) 5 (Gallagher from Instrument Choice)
Both systems offer an app. The SmartWater app has only a few reviews, and not so positive. The Aquatel app has no reviews at all.
I’m not that comfortable relying on an app as an integral part of a long term solution. Though if your car is dependent on Android Auto or Apple CarPlay, then why not allow your tank to be dependent on your phone? Answer: because these apps are little used and you can’t assume they will be maintained/updated.
Luckily, both systems offer their own display unit as an (old school) alternative to the app. Aquatel’s could use some Jony Ive.
The easiest way to work around the proprietary nature of all this is to build your own using Arduino; there are heaps of options, but see for example https://projecthub.arduino.cc/Manusha_Ramanayake/wireless-water-tank-level-meter-with-alarm-ce92f6
It all comes down to how you want to allocate your time versus your money …
Special mention for the $32 Lucano manual kit: tankwaterlevel.com
I ended up buying the SmartWater system for 2 tanks, and the Lucano for my nearest tank. Delivery of the SmartWater system from NZ was hassle free.
Accurate tank monitoring has made water transfer so much easier 🙂
The environmental movement has historically embraced renewable energy as unequivocally “good”.
In contrast, ever since the first winds farms were proposed in Australia, objectors have said “I support renewable energy, but just not here“. They’ve been on their own.
2019 was when the environmental movement at large first became aware a more nuanced position might be necessary: Bob Brown spoke out against a proposed wind farm on Robbins Island on the north coast of Tasmania. But little has happened since.
A sensible position would be:
Onshore wind farms should only be allowed on farmland and that farmland must be at least 5km away from a national park, nature reserve, or major river or wetland
Existing farm land is a suitable place for renewable energy since this is already exploited economically, has already lost most of its environmental significance, and is capable of simultaneous dual use, that is farming under turbines.
Without a proximity restriction like this, areas of land reserved for nature are further threatened. Surely the least we can do is leave these alone, via a suitable buffer zone (eg 5km)?
Here is a partial list of current wind farm proposals abutting national parks:
Alectown (Neoen) near Goobang National Park (NSW) (work on scoping report underway again)
Chalumbin (Epuron) adjacent to the Tully Falls national park (Qld)
Hills of Gold (Engie) neighbours Crawney Pass National Park and Ben Hall’s Gap Nature Reserve (NSW)
Jeremiah (CWP) abuts Murrumbidgee River and neighbours Burrinjuck and Black Andrew Nature Reserves (NSW)
Kentbruck (Neoen), with Discovery Bay Coastal Park to the south, and the Lower Glenelg National Park and Cobboboonee National Park to the east and north‐east
Liverpool Range Wind Farm (Epuron, now Tilt), adjacent to Coolah Tops National Park (NSW), approved 2018, but now the subject of a Modification Application (fewer but bigger turbines)
Winterbourne (Vetas), Oxley Wild Rivers National Park, Gondwana Rainforest of Australia World Heritage Area and areas of declared wilderness under the NSW Wilderness Act 1987
No doubt there are others; it would be good to add them.
The proposed Jeremiah wind farm is not just close to Nature Reserves; it also abuts the Murrumbidgee River valley before it emerges into the riverina plains, a significant riparian and landscape feature.
In each of the above cases, locals are isolated and alone, fighting to protect vestiges of nature, without the assistance of laws people would expect to be in place. The same protracted battle, different participants, over and over.
Occasionally the locals eventually win, an example being the Jupiter Windfarm south of Goulburn NSW, but this seems to come down to being vocal and demonstrating an absence of social license (that is, human interest), as opposed to the intrinsic interests of the natural environment.
Back in 2019, Richard Dennis wrote “There are better and worse places to build turbines. Australians should be encouraged to take part in such debates”
In NSW in 2021, alterations to policy settings acknowledged there are better and worse places in a small way:
But so far, there is no policy to enshrine the obvious point made by the Wilderness Society in America:
we need to make sure renewables are being built in the right places, limiting impacts to sensitive wildlands and wildlife.
In Australia, the bar is far higher: the EPBC Act protects only “Matters of national environmental significance” (think world heritage, wetlands of international importance, nationally threatened species).
State legislation tends to leave it pretty much at that, also keeping them outside parks. In Victoria, for example, Wind energy facilities are not permitted in national parks, state parks and coastal parks and other high quality environmental and landscape locations in the state.
But they are allowed next to them – no buffer zone – as close as you like, even though birds and bats take little notice of such boundaries.
Unfortunately, without Australia’s premier environmental organisations taking the lead, there is little pressure on government to enshrine better protection in planning policy.
For example, the ACF wants Australia to be a renewable energy superpower, and have strong environment protection laws, but doesn’t acknowledge any friction between the two.
With a new age of energy comes an opportunity to create a better relationship between nature and energy projects. The transition to renewables must be just; for communities and for nature. While a transition to renewable energy is essential for a safe climate future, so is the protection and enhancement of Queensland’s natural areas, its forests, water ecosystems and wildlife.
We will not support any energy development that comes at an unacceptable cost to nature, including renewable energy. That means it must not
– Be on the site of, directly adjacent to, or directly impact:
Matters of National Environmental Significance Matters of State Environmental Significance
– Reduce or remove threatened species habitat
– Adversely impact aquatic ecosystems or water sources
But that’s in Queensland, and its not government policy, there or anywhere else.
And so in Tasmania, the Robbin Island proposal near the Robbins Passage/Boullanger Bay wetlands grinds on.
It shouldn’t be this way. Why the silence from the green lobby?
“At the moment we have a situation where any private landholder can offer up their land for an energy project.
“Private landholders and big companies should not be dictating where our energy infrastructure is placed.
“Instead we say the State Government should be putting in place publicly agreed planning laws which identify appropriate areas – and importantly, specify no-go zones.”
Is it so hard to take a clear position? CAFNEC shows the way.
Whilst renewable energy is “good”, it is better in some places than others. When can we expect the ACF et al to clearly articulate this?
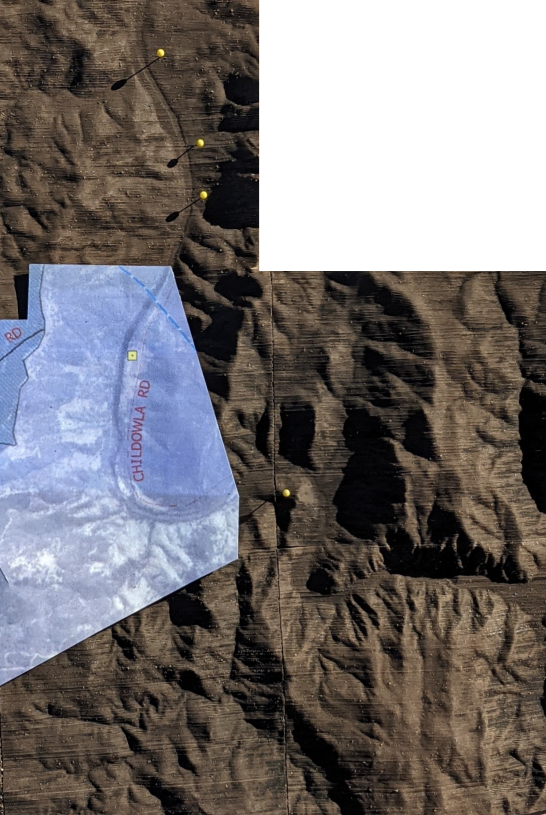
Those are .asc files; I used QGIS to merge them then export a .tiff.
The trick is to choose suitable dimensions for your output device. I’m using a Snapmaker 350, laser cutting A3 sheets of cardboard, and happy enough to use a dozen or so sheets per “tile”.
For my output device – a laser cutter – a tile width of 160 works well (I get 2 rows of slices per page), and for my model I’m using 5 tiles wide by 6 tiles high.
(I could use a tile width of say 340mm in my SnapMaker – and thus fewer tiles – but the corresponding STL file would then be large enough to kill Slicer. So 160mm tiles it is.)
TouchTerrain_standalone.py runs pretty quickly (tens of seconds), on my tiff, doing a single tile.
My cardboard purported to be 0.85mm thick. It was actually 0.82mm thick. So an important preliminary is to measure/verify the thickness of your cardboard yourself. If you do this, then when you start on a new tile, you can use a different cardboard thickness (for example, a thin cardboard for tiles you want finer detail, versus thicker cardboard for flat/boring terrain)
With a 5M DEM, I could probably use something half that thickness (with little change in processing time, provided I could cut it in a single pass ie halve the number of passes).
Once you have an STL file, there are lots of programs you could use to render it on your computer (though there is no need to do so).
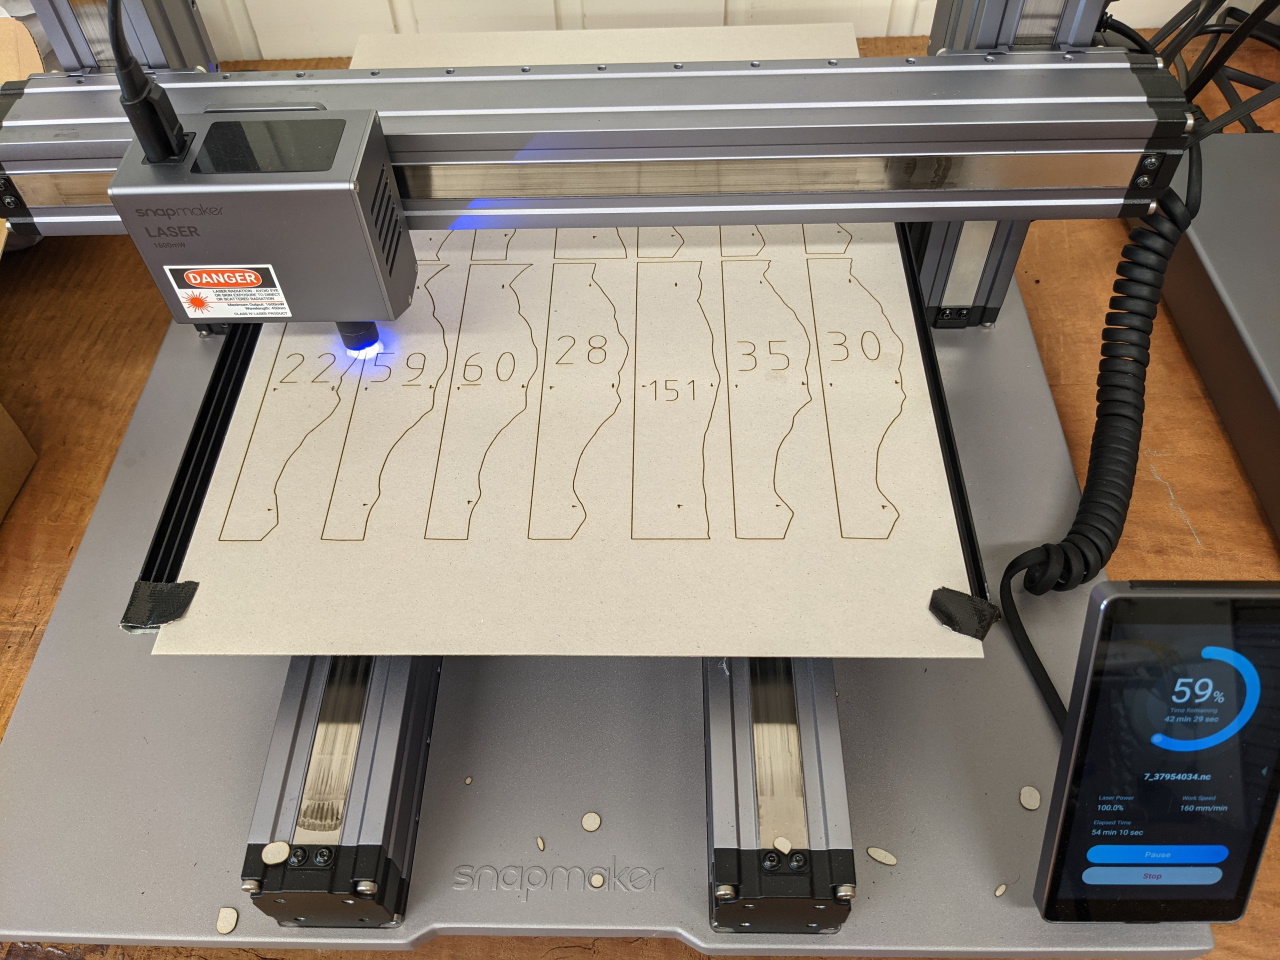
Making the physical model
I’ve got a Snapmaker 350, which can do 3D printing, but also laser cutting.
I chose to laser cut the model on sheets of cardboard, to avoid using lots of filament.
SnapMaker’s Luban software expects an SVG file, so we need to go from STL to SVG somehow. We can do that using PDF as an intermediate format.
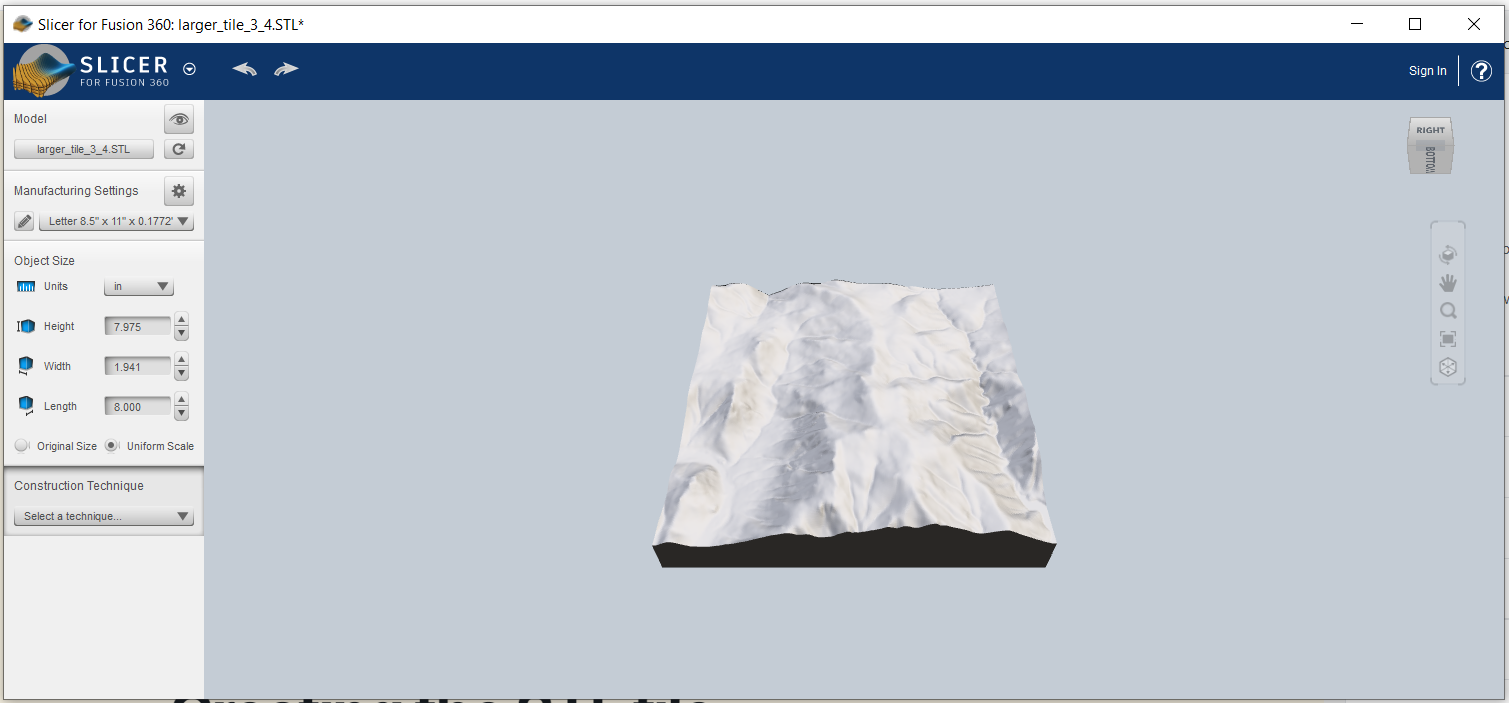
Slicer for Fusion 360 can convert STL to nicely arranged slices, output as PDF.
To begin, import your STL file. You should see a 3D rendering of it.
Slicer for Fusion 360 is less than ideal in that it is no longer maintained, and crashes if the STL file is large (eg 50MB), though 20MB STL files work OK.
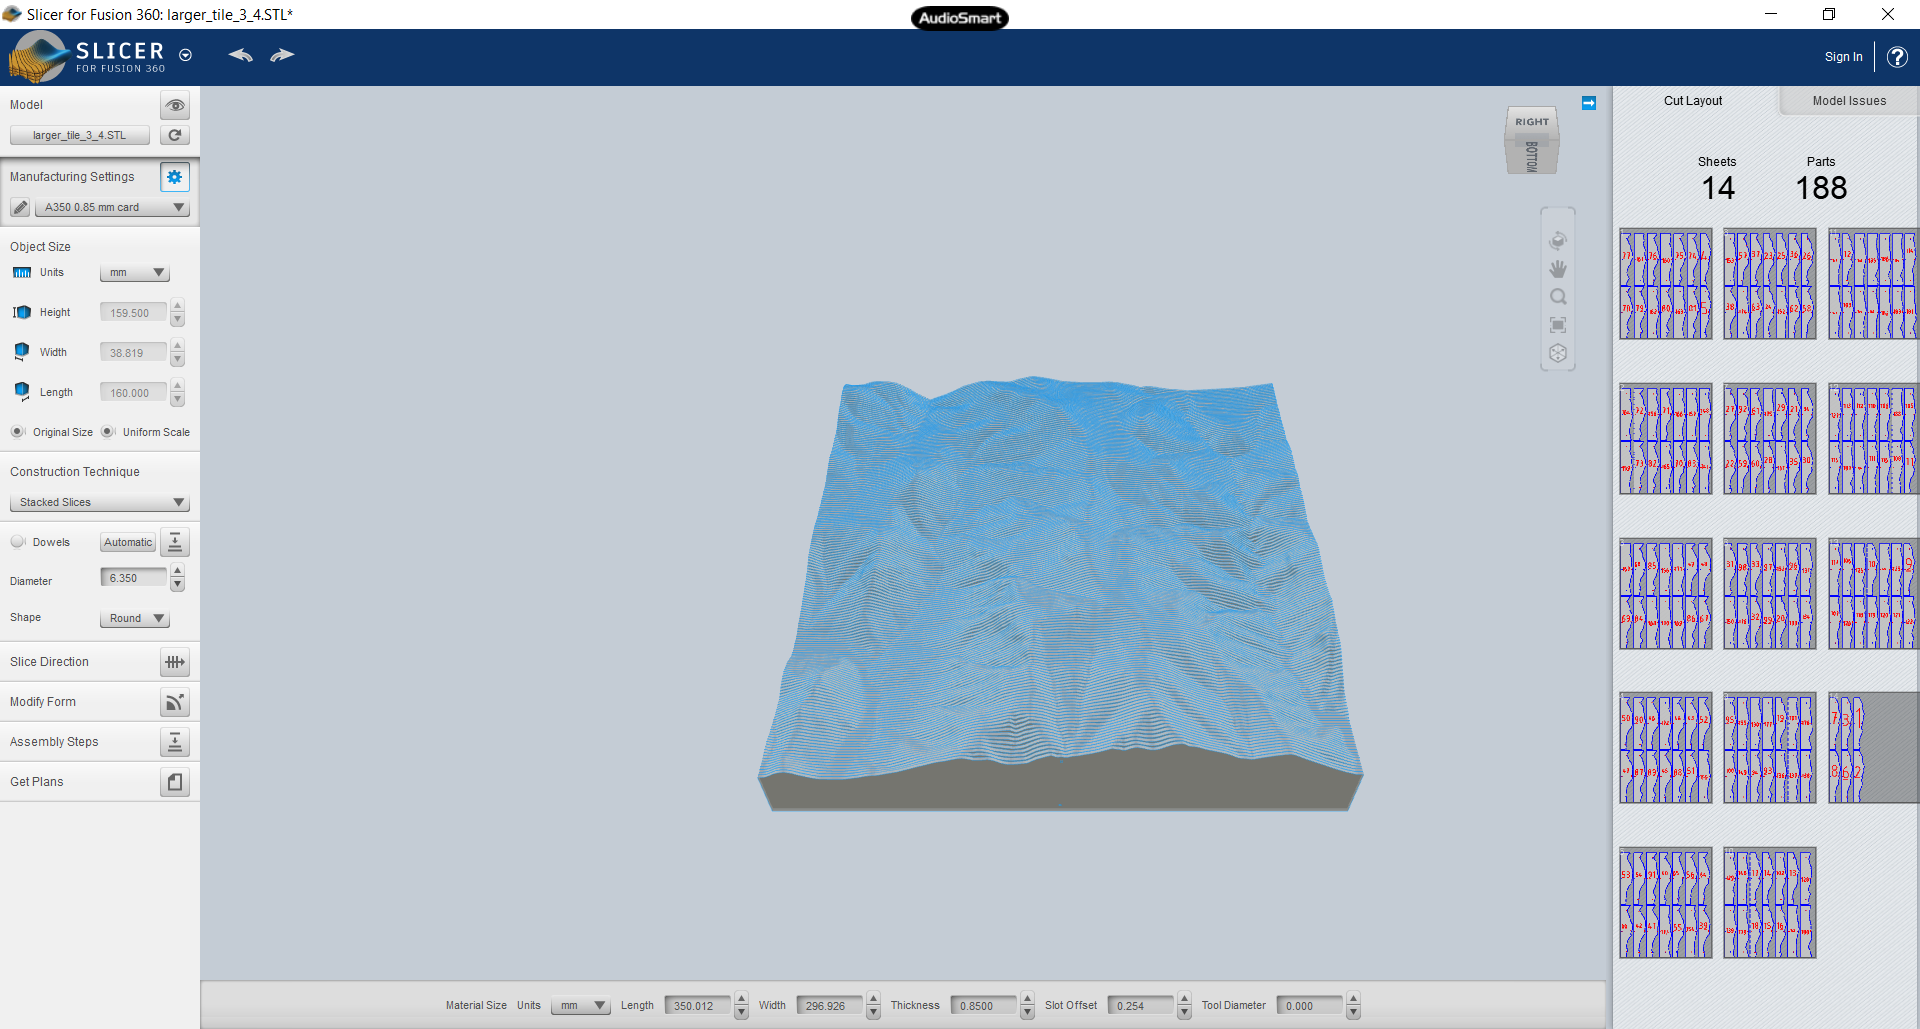
Define the material:
For width, we use A3 width; for height, the Snapmaker’s 350mm. Thickness is that of our cardboard.
Set the object size to its original size; it should match what you got out of TouchTerrain. After choosing the construction technique “Stacked Slices”, you should see something like:
Then press the “Get Plans” button, choose file type PDF, then hit “Export to my Computer” button.
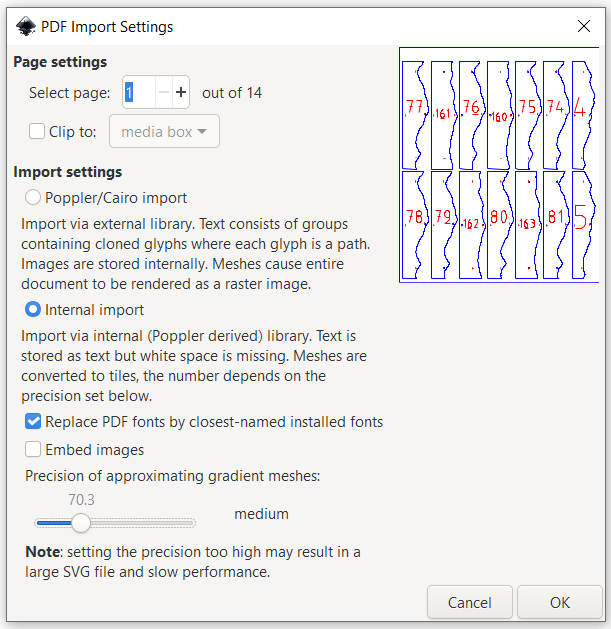
We’re done with the slicer. Now we can use Inkscape to convert the PDF pages to SVG. Import the PDF (a page at a time); be sure to uncheck “embed images”:
In Document Properties, you want the same custom page size of 297×350. Position the objects on the page.
There’s a rectangular path surrounding all the slices. Delete that, which I find easiest to do in the XML editor.
Save the SVG file, and you are done in Inkscape.
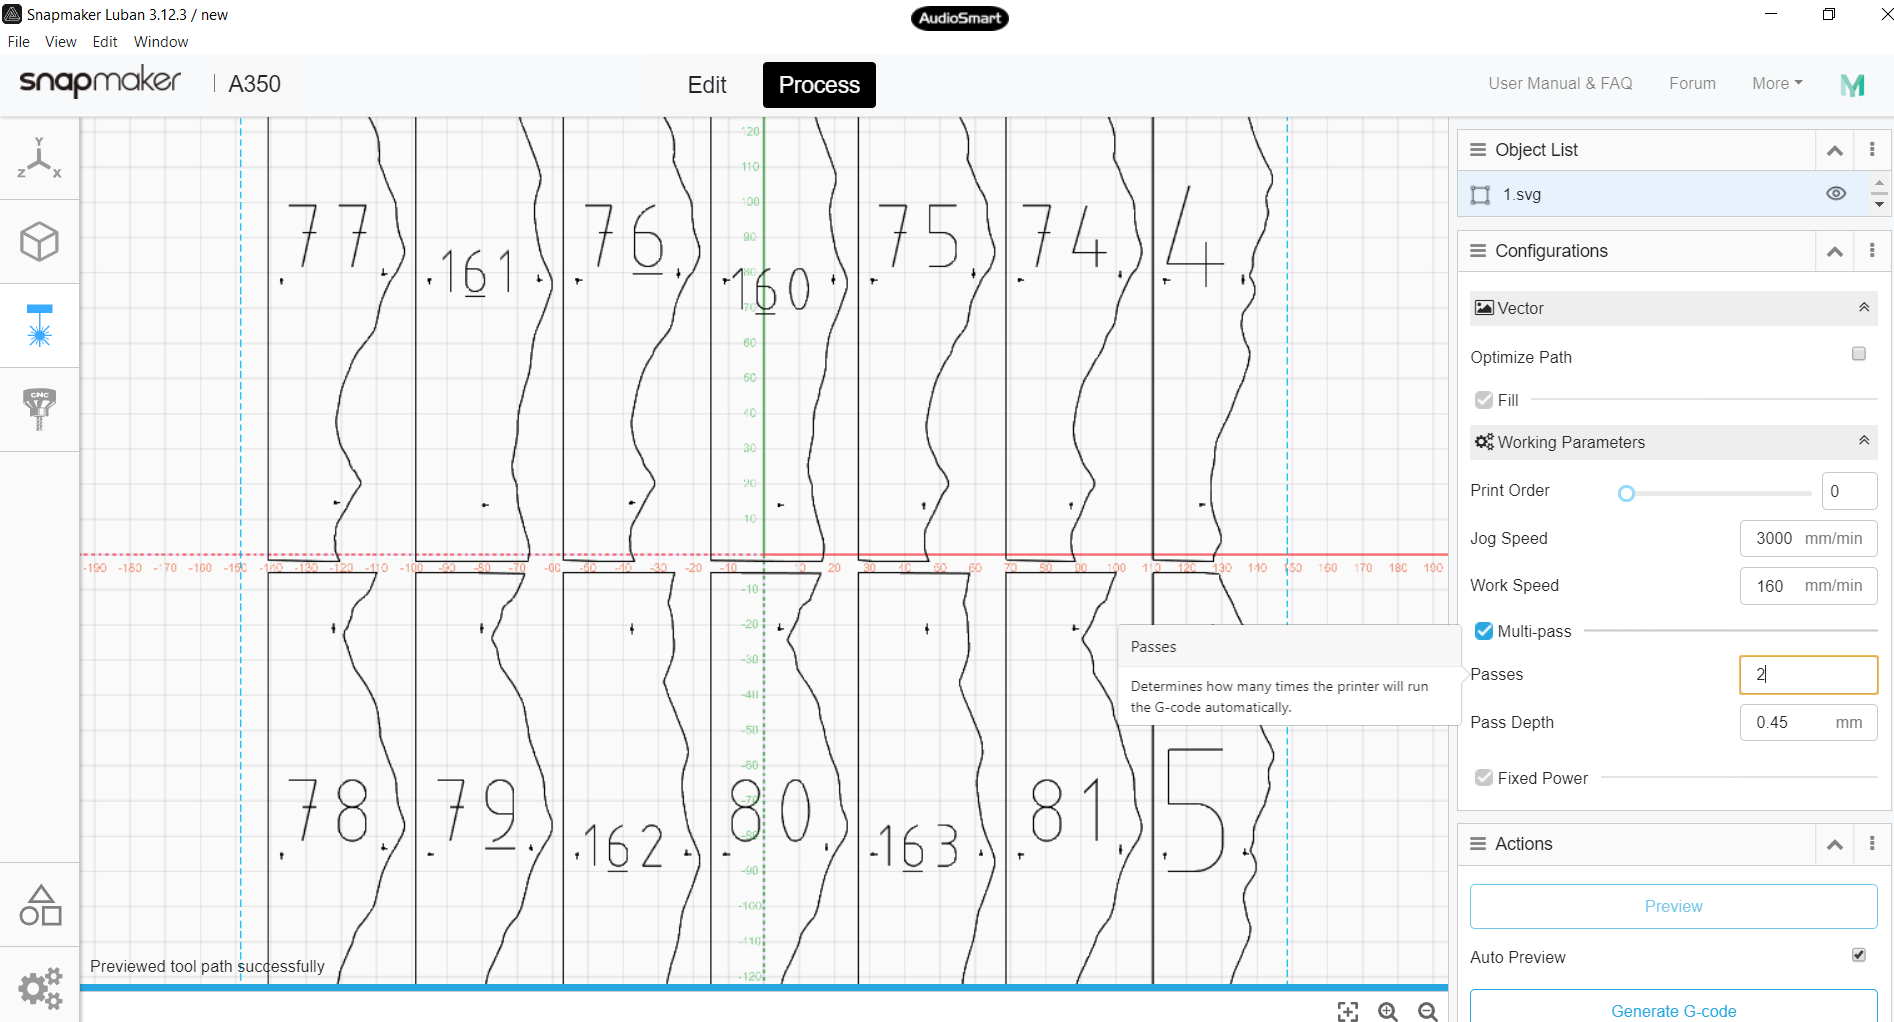
To print using SnapMaker, we use Luban to create gcode from the SVG.
In Luban, choose the laser cutter, the “Add” the svg. Change the width to 297, then hit “Process”.
For my 0.82mm cardboard, I do 2 passes at 0.45:
Now you can “Generate G-code” and “Export G-code to file” to put it on a USB stick you can insert in SnapMaker.
I won’t go into the operation of SnapMaker here, but just make 2 points.
First, its thickness setting adjusts in 0.1mm increments, so for my 0.82mm cardboard, I used 0.8mm.
Second, since its a tight fit on the page, its worth doing “run boundary” before starting the job.
It takes around 90 mins in total per laser cut page (ie for the 2 passes), using a work speed of 170mm.
A note on materials. I sourced my cardboard on eBay. For A350 users in Australia, I’d recommend https://www.ebay.com.au/itm/181782570520. Note that it is advertised as being 0.85mm thick, but I found it to be more like 0.8245. Make sure you measure your cardboard thickness!
Assembling the tile
With my cardboard and model, there are 188 slices per tile, printed over some 13 pages. Once you’ve sorted the tiles into the correct order, you need a way to hold them together.
Slicer for Fusion 360 makes a hole in each tile which you can thread a rod through (the size of the hole depends on what you specified).
The 2TB SSD in my computer got full, so time for the next size up (4TB).
This post is a note-to-self, to remind me of the minefield when it inevitably comes time to move from 4TB to 8TB…
I hoped Clonezilla would copy the old SSD to the new one, after which I could resize the partition, but it didn’t turn out to be this easy.
The first time I ran Clonezilla, it failed with “the disk has bad sectors”.
So I tried it again, with “-rescue” so a read error wouldn’t stop it.
That allowed Clonezilla to complete (1 hr 40 mins, ave 20GB per min), and I could open my LUKS encrypted volume (cryptsetup luksOpen), but the BTRFS inside it was broken: bad tree block start .. failed to read tree root. Bad superblock.
I gave up after 6 hours. It uses btrfs send receive, and unfortunately that seems very slow. (btrfs send receive was still executing on the first volume, and I could see there were still others to go). I also have some areas set up not to copy on write, and I wondered whether these would be handled correctly.
So then I thought I’d use Clonezilla on the unencrypted volumes: run cryptsetup luksOpen for the source and target, then mount them.
A hiccup was I couldn’t mount the target, because it had a duplicate device fsid. And btrfstune couldn’t change this (because the filesystem is broken – see above). So I ran mkfs.btrfs, and then used btrfstune to change the fsid. (I could’ve changed the fsid on the source device instead, but I didn’t want to do that)
With this, I was optimistic that partclone.btrfs (on Clonezilla live) would “just work”.
It didn’t. It failed with “set block .. out of boundary”.
What value to use for the bs parameter? https://unix.stackexchange.com/a/584912/314086 suggests one should pay attention to the “minimum block erase size” (just for erase?). Also note for next time: “it’s generally beneficial to align partitions according to the erase block size”: https://www.phoronix.com/forums/forum/hardware/general-hardware/1030306-samsung-970-evo-nvme-ssd-benchmarks-on-ubuntu-linux
But I just set bs 1M. Then I got lots of Input/Output error (but around 300 MB/s iirc)
That’s no good, so I considered ddrescue, but got cold feet when I read reports of it taking “weeks” to run 🙁 https://superuser.com/questions/413650/is-there-any-way-to-speed-up-ddrescue
So back to dd: I used bs=1K. This was slower (around 100 MB/s), but hopefully less data loss (see https://superuser.com/questions/622541/what-does-dd-conv-sync-noerror-do ). (Since only 1K being written; I think some areas were now also error free; see also https://unix.stackexchange.com/questions/329986/does-dd-i-o-read-error-alway-indicate-hardware-failure )
When this finally completed (after 21,000 sec), it was time to:
In the Dell setup (I use refind, not grub), setup a new UEFI boot option (it populates the “file system list”; I just had to navigate to the “file name”: the refind .efi executable).
And ta dah! .. everything works 🙂
If Clonezilla hadn’t complained at the start about bad sectors, would that have been a viable way to clone? Quite possibly not, it still seems that its better to luksOpen then clone. What I do need to do is make sure that (1) the SSD is physically healthy (using SMART in the Dell bios, or Linux https://wiki.archlinux.org/index.php/S.M.A.R.T. ), and (2) the file system (btrfs) inside LUKS is good too. Time now to run btrfs balance?
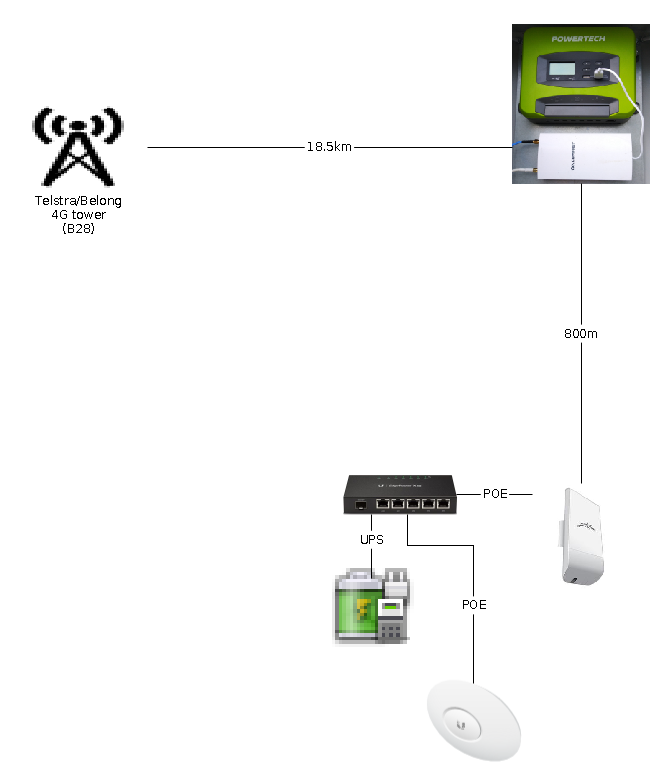
In putting mine together, I’ve tried to keep the number of moving parts down, and use “cheap but reliable” components to end up with something robust and “performant”.
Under $1500 for what’s shown here in this end-to-end diagram:
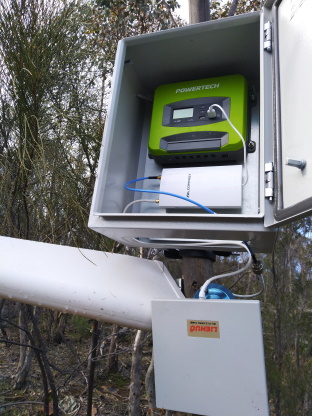
On the Hill
Here’s what I’ve got on the hill:
Plus battery and solar panel of course – the battery sits in the box in front of the Comfast unit.
The little white thing is a Comfast E5 (which came on a slow boat from China due to COVID)
which contains a modem to connect to the Telstra tower, and a wifi network to the house. Its powered by USB (5V, 2.5A; the specs say the E5 uses <12W).
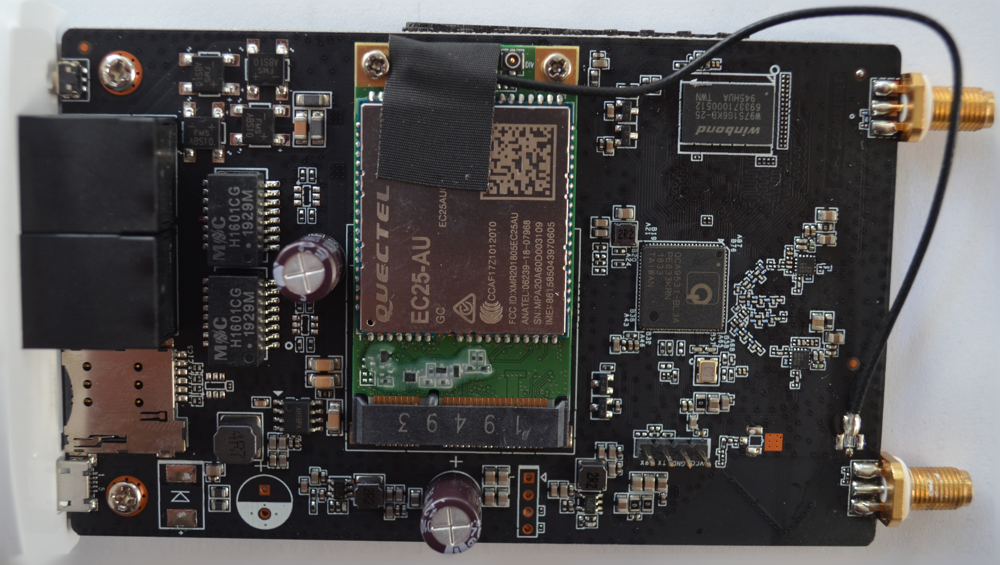
Here’s what’s inside – a Quectel EC25-AU:
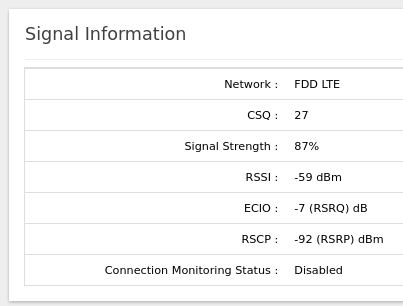
It only exposes a single 4G antenna (no MIMO unless you add another), and its a class 4 device (so no carrier aggregation), so its not the fanciest modem, but the speeds shown above are good enough for me, and having just 2 antennas is simpler. So as long as it proves reliable and sips little power, I’m happy!
Average power consumption (over a 4 day period) for my usage, is 0.35A. At 5 volts, that’s 1.75 watts, or 42 Wh per day.
The 2 antennas are just:
wifi: the “LIEHU” flat panel is an el cheapo $9 wifi antenna (claimed 14dbi)
4G: LPDA antenna from https://www.ebay.com.au/itm/183762388396 which claims 9 dBi gain for B28. Its vertically polarized, but you can see I didn’t worry about that too much 😉
I built ROOTer 1907-2 for ATH79 (there’s a COMFAST CF-E5/E7 profile) and installed it.
USB socket (this one claims 2.4 amp, more than some of the others)
Remote monitoring (power generation, battery state, power draw)
Timer
.. and the fact that I could buy it locally over the counter.
The reason a timer is of interest is to turn off the E5 during sleeping hours, to save battery power. But if the E5 is off, my weather station doesn’t upload (it can’t cache), so my weather record is compromised. Similar issue with any security cameras, so its much better if the E5 can run 24×7. It turns out that the load-on/off timer doesn’t apply to the USB socket, so its not even an option.
The load monitoring doesn’t measure the USB socket either (nor did it measure the power draw of the E5 when connected via non-USB? Have to double check this…). The ECO Solar app works OK for me, but could be better. God only knows why Electus/Jaycar/Road Tech Marine don’t employ someone to write decent English language instructions…
Since it doesn’t quite live up to expectations, you could use a much cheaper controller, and a $20 Jaycar MP3675 12V DC to USB convertor. (Plus a timer if you choose)
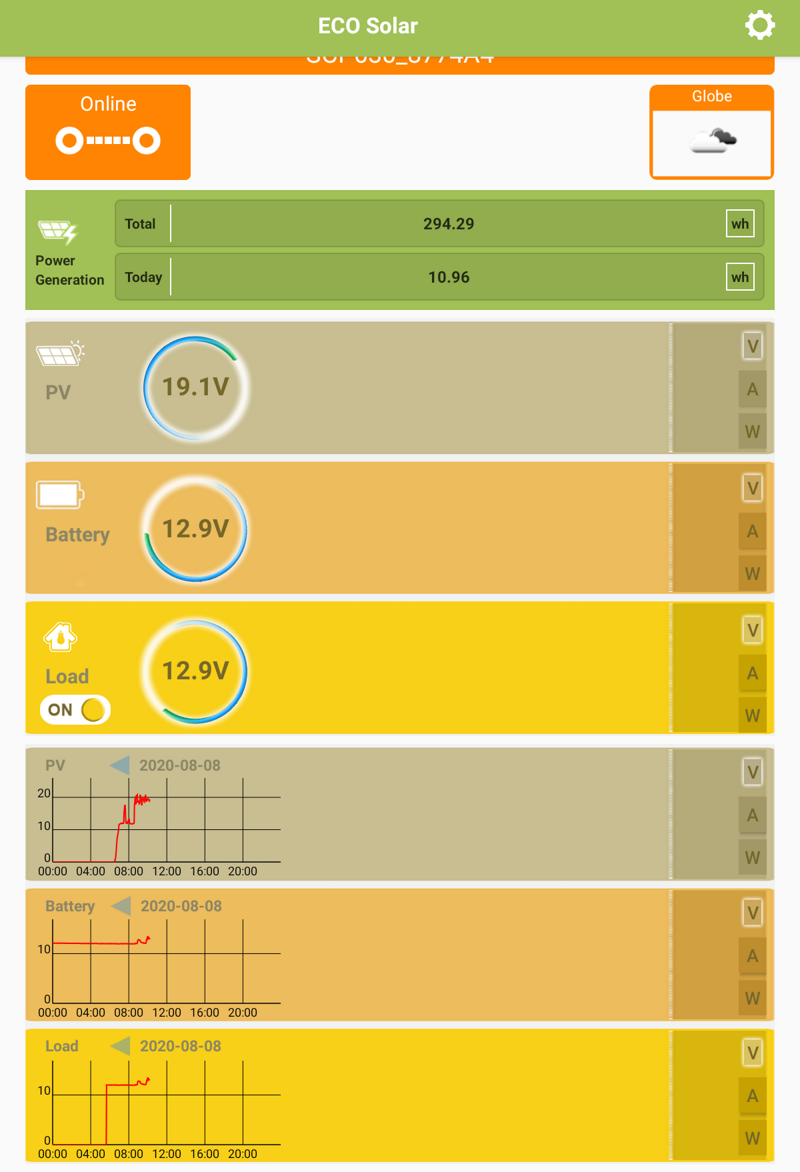
That said, the app does produce some real-time data:
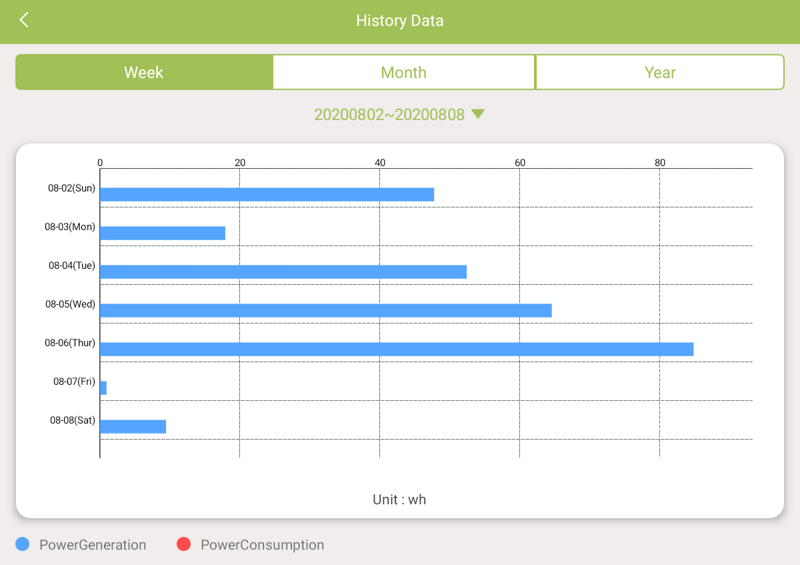
(just ignore the load info) and historical data:
(Yesterday it rained all day, hence the poor power generation; today, it is only 10am, so that most recent bar will increase) Over August, it averaged maybe 60Wh per day, which is more than the 42Wh typically used.
At the House
At the home/office I use 3 pieces of Ubiquiti kit:
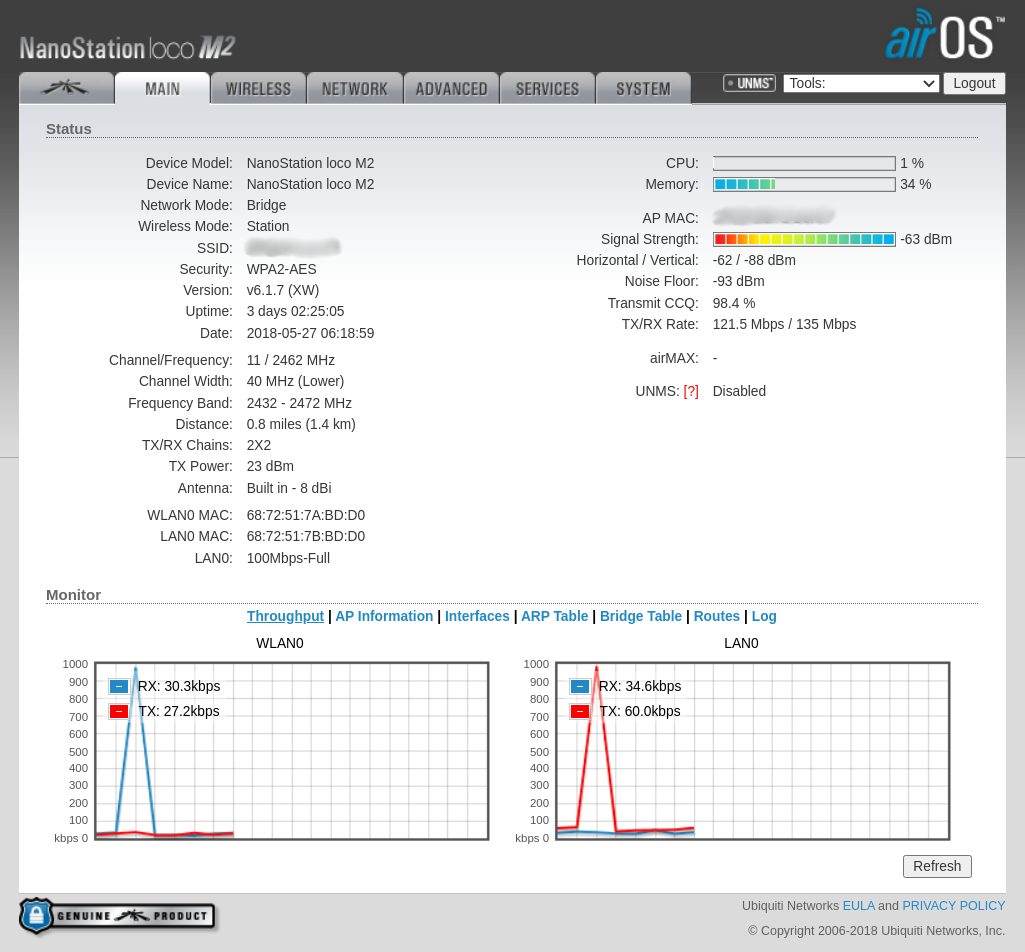
NanoStation loco M2, to connect to the hill (using its internal antenna) at 2.4 GHz
UniFi AC LR AP, to provide wifi around the house
EdgeRouter X SFP (ER-X-SFP), which provides power (POE) to both the above devices, and DHCP (the AP can’t do that). I’ve got a UPS powering the router, so this stuff will run for a while if the power goes out.
Troubleshooting
Things seem to be running smoothly.
I do have a cron job running on the Comfast unit to restart wifi periodically (after it crashed on me once). I don’t want to have to walk up the hill to reboot it. Although if you can send an SMS, apparently ROOTer supports a remote reboot-by-SMS. You send an SMS to the SIM card’s phone number, containing just:
::reboot!!
But if there is no Internet, the first thing I do is look at the NanoStation to see whether it is connected to the Comfast unit:
That’s most of it; there is no pole priced here, since everything is hung on or screwed to a gum tree 🙂
Next Steps
I still have the Satellite NBN, so I should connect it to the router. Maybe I’ll route some traffic over it. But mostly, it is peace of mind if the tower in knocked out in a bushfire.
Evaluate epever triron as a possible replacement for the SCP30. Mostly out of curiousity, and just in case…